


On the left side you can see the top and perspective viewpoints of both sides of the coin, as textured by me. An old, golden coin with a darker bronze on the inside and a green, glowing gem in the middle. On the right side you can see the original sides of the coin, without any textures in the same perspectives. As you can see, I didn't change anything about the model. Yet the feel of the coin is entirely different. This is what textures can do. What would a game be like if it was all a light-gray colour?
But let's start with how I textured it.

Of course, we'll start with the plain, gray model. You'd only need one, but I use two as an example for now. We'll immediately start by making 3 Texture Materials. These materials will be as followed:


A browish colour, gold and green. The values don't have to be the exact same though. It's just what I thought to be the closest to the original colours.


In these pictures I focus mainly on the right coin, as I need to apply all 3 colours to it. I simply start with applying the gold colour to the entire coin. Next I'll select the inner circle only and apply the green colour on it. This already gives it a nice little shape. The last colour, the brown, will be the hardest. First off, select the lower ring, above the green like I did. This might take some zooming in and out and some manoeuvring of the camera to get everything selected. Remember to hold Shift when you let go of the mouse, this'll keep the selection going.

When rendered, the coin will look as above. True, I already put a light with some external effects on it like Ambient, which gives a slight reflection and brings the shadow out nicely. However for our next steps, we'll be doing some detail work with the textures. Starting up with the gemstone in the middle. Green.

First off, make sure the following boxes are marked: Colour, Luminance, Reflection, Bump, Specular and Glow. The colour stays the same as before though.

As for Luminance, quite easy. Simply set it to 25% brightness and make it green. Try to match the initial colour but go slightly darker. If the luminance is darker, it'll be less visible. And in this case, we do want a slight, but clear luminance.
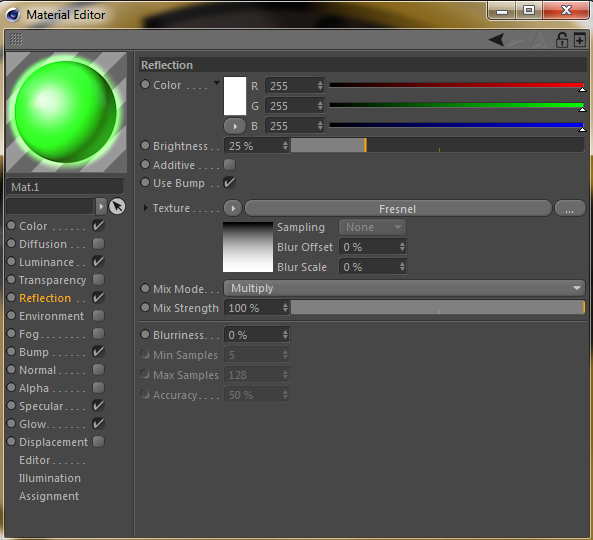
Reflection is easily done as well. We'll add a simple Fresnel texture, put the Brightness to 25% and put the mixmode to Multiply. The latter is most important actually. If left on Normal, the reflection will be way off and much brighter.

Bump takes a bit more, even though you'll barely see it in action on the render. However all you'll do is select the Wavy Turbulence and change the settings slightly. You can make this as strong and clear as you want though, I'm planning to redo the bump to make the gem look cracked.

Specular will just need a little adjusting. Set it to Metal and change the numbers as I did. In the end, there will be no clear reflection, which is the point as it is a glowing material.

Finally it's the glow, which will brighten the entire colour slightly. Increase the Inner Strength and decrease the Outer Strength, using the Material Colour. Now we'll apply it.

It's a big difference as you can see. It already gives a better feel to the rest of the coin as well. But we're not there yet, still two other textures to complete.

Now for the bronze, it's a bit harder work. We'll select Colour, Diffusion, Reflection, Bump and Specular. Colour immediately starts off rougher, as we'll need a noise. The biggest thing here is to blow up the scale a lot. 1500% for me. You'll see the outcome of that in the end, when we're finished with the reflection and specular.

Next stop is the Diffusion, where we go in a layer. Putting a Distort and Noise on it first, we'll give the Distort an electric Noise with 20% strength. The regular Noise will be a Luka, nearly unchanged.

Now the reflection. The main colour is a brownish one. Not too light, not too dark. As texture we'll put in simple Fresnel, with the black part tuned to a lighter gray and the Mix Mode goes to Multiply. Blur is optional, I used it for the effect. See? We're already seeing some form in it!

Here comes the harder part. We'll put the Strength to 30% now and go into a Layer. Inside the Layer we'll create two Noises. One becomes an Overlay type, the other stays Normal. We'll start off with the Overlay, which I've marked with a blue 1 and is on the bottom right side. A Turbulence slightly boosted to 200%. The Normal Noise, which is marked with a red 2 and is on the bottom left side, is a Voronoi 1 with a high boost to 1500%. This'll give it the old, bumpy, rusty feel to it.

Finally the Specular. Nothing much luckily. We change the mode to Metal and change the width and length slightly, that's all.

I've placed the previous coin, where we did the green gem in the middle, on the left side. You can see some changes, but not much. This isn't a big deal as the yellow takes most attention. We'll work on the yellow next, which will change the entire coin.

We'll start off with selecting the Colour, Diffusion, Luminance, Reflection, Bump and Specular options. This'll be the longest and hardest of the three. For colour we'll immediately start off strong by putting in a Noise. This Noise will be boosted 1500% with am FBM texture to it.

The Diffuse uses a Layer first off. No changes to the original part. Inside the Layer it uses a Distort and Noise. Basically the same as the Bronze colour had. The Noise is a Luka with a slight bump to 200%.

Now Luminance is a weirder one. Start it off with colouring it slightly darker than the gold we used for the Colour. Make the Mix Mode and Multiply and add a Lumas texture. The Lumas Texture has several parts to it. Just change the ones I've done.

Reflection is easy. A simple Fresnel, colour change and Mix Mode Multiply. The blur again, is optional.

Bump will be like the Bronze as well. Overlay is on the right side, Noise is on the left side. Pretty much exactly the same settings as well.

Specular is easy as well. Mode to Metal and a few numeral changes. That's it for the textures! And this is how it should look:

The previous one on the left, the final one on the right. As you can see, the bronze does come out more now the gold is less bright. Of course, you can mess with the lighting, camera and reflection for yourself. If you want, you can try it for yourself with different textures! This is how I textured my coin, and I do like how it turned out. I hope you enjoyed this tutorial! If there are any questions, feel free to comment.


0 reacties:
Post a Comment