For our 2nd part of the Chess tutorial, we'll be making Pawns. They come in great numbers and have the ability to become anything. And because they take up half of the entire army, they're the most logic place to start off.
1) Pawns are fairly easy in design. They're basically a cone with a sphere on top. So that's where we'll start. Both can be found in the Objects section.

2) we'll place the sphere on top of the cone for now and tick it off, so we won't see it. The cone will be our main job for now. You can tick objects on and off by clicking the checkmark or the red X next to the item.

3) I want to edit this part in detail with my hands, instead of with numbers. It might be taking the hard way according to some, but it gives me a better feeling and more control over how it'll look. That's why I'm going to use just 10 Height Segments for now and move to the Front viewport, which will make it easier. It doesn't matter whether you go to Front, Back, Left or Right though. And of course, we'll make it Editable.

4) Next I'll zoom in a bit, select the Point Selection and toggle off "Only Select Visible Elements". This'll make sure I can grab everything behind my point of vision as well.

5.1) Since a pawn has a slightly bulb-like bottom, that is what we'll go for. Now I'll select the bottom row and drag it inwards, shrinking it with the Scale too to roughly 70%. This'll be a few short sections with more pictures than explanation, as it doesn't need any explanation.

5.2) The row above will be dragged down 10cm but stays at the original size. This'll be the first "ring".

5.3) The 3rd row goes about 17cm down, ending the first ring. Scaling it down with 90%.

5.4) The 4th will go 20cm down and scale up to 120%.

5.5) Row 5 goes roughly 25cm down and gets scaled up to 110%.

5.6) The 6th will just go down with 20cm.

5.7) And the 7th just moves down 10cm.

5.8) The 8th row goes down roughly 29cm.

5.9) And the 9th will slide down 20cm.

5.10) The 10th lowers 10cm and scales up to 250%.

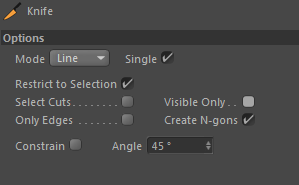
5.11) Now I want two more lines to work with for the final part. So I'l use the Knife tool. Again, deselect Visible Only. I use Shift to make a straight line and cut two more lines on top. It doesn't matter where exactly, as you'll have visuals where I'll place the lines in the end. You can use that as guides to place yours if you want an exact copy.

5.12) Now that we have an 11th and 12th rows, we'll have the 11th line scale up to 180% and lowered roughly 7cm.

5.13) To match the size, the 12th row will be scaled up 380% and lowered 10cm.

6) We now have a very rough Pawn model. It still doesn't look that good though... very pointy. So let's see how a Subdivision looks.


7) A lot better already. But it still needs its head to make it look better. Thus we'll add the sphere back, by checking the X back on.

8) It's way too big now obviously. So I'm scaling it down to 50cm and dragging it down to be on the right height. Which for me is about halfway down the top section.

9) Now traditionally, the pawns head is a little dented on top. So let's just do that as well. But instead of editing the sphere and making it harder for ourselves, a Melt Bender would give a good effect as well. Any strength between 1% and 5% works pretty good. I'm going with 2%.


10) However for the 2%, it's a little bit too big again. So I'll scale the sphere down another 20%. This is more nitpicking from my side though, which is what I enjoy doing with these projects.

11) Any chesspiece does have a piece of felt under it. So we'll need to do that as well. As it's a circular piece which is the same size as the bottom, a simple Cylinder will do.

12) We'll start off with resizing it to 70cm radius and just 1cm in height for now.

13) I do want the felt to be more than just a cutout piece, so I'll give it a falloff as well. I'll scale the bottom down 2,5%.

14) The pawn is finished, I'll just name every object, add it all together in a Null Object and save it. Texturing will come
later.


I hope you enjoyed this tutorial! If there are any questions, feel free to comment.


0 reacties:
Post a Comment